About Me

My photo
I LOVE to design and to paint whimsical items that will put a smile on your face. Each day I share my simple life with you as I try to encourage, to inspire and sometimes JUST to make you smile as I recount my life growing up on a dairy farm! I've never had many material items in my life, BUT I have been blessed beyond words with love and encouragement from WONDERFUL Parents who instilled in me WHAT was important. I have had EVERYTHING that I needed and WAY too much of what I wanted. I am slowly learning to be a better person each day through my interactions with my friends on Facebook. Some day I hope to be as good as people seem to THINK I am! I am BLESSED! Welcome to my little corner of the world...Please stop by and visit often!

Tuesday, November 28, 2017

Gingerbread Ornament

As a member of several groups, I see the same questions over and over, but I guess it is true, if you don't know, you don't know.

My question is: what have you done to find the answer?

😁😂🤣😃

Basically, you have 2 forms of surfaces: wood type, or unslick, and glass/plastic types, or SLICK.

If you have a non-slick surface, basically, paper, wood or mdf, then the choice is yours to seal it or not. If it is a more porous surface, or, a surface that "drinks" your paint, then, yes, by all means, seal it, or you will be painting for days, and quite possibly will never get an even coverage.

Seal it with an all-purpose sealer. You can even mix this half/half with your base coat for the first coat. This isn't a bad habit to make!

Now, slick surfaces. 

If it is slick, then you MUST prepare your surface in some way to give it a "tooth", so your paint will have something to hold it in place. 

What  are some slick surfaces?

Metal, glass, vinyl records, plastic, slick mdf, candles, soap...


Today, I will share ONE of many ways to paint on glass.

My favorite product for painting on slick surfaces, especially plastic dominoes, metal and glass, is to use DecoArt Paint Adhesion.

CLICK HERE to go to the #decoart website to order

You simply mix it with equal amounts of Acrylic Paint, and basecoat it. I base coat it again with straight Acrylic paint, and paint as I normally do.


I love this product! 

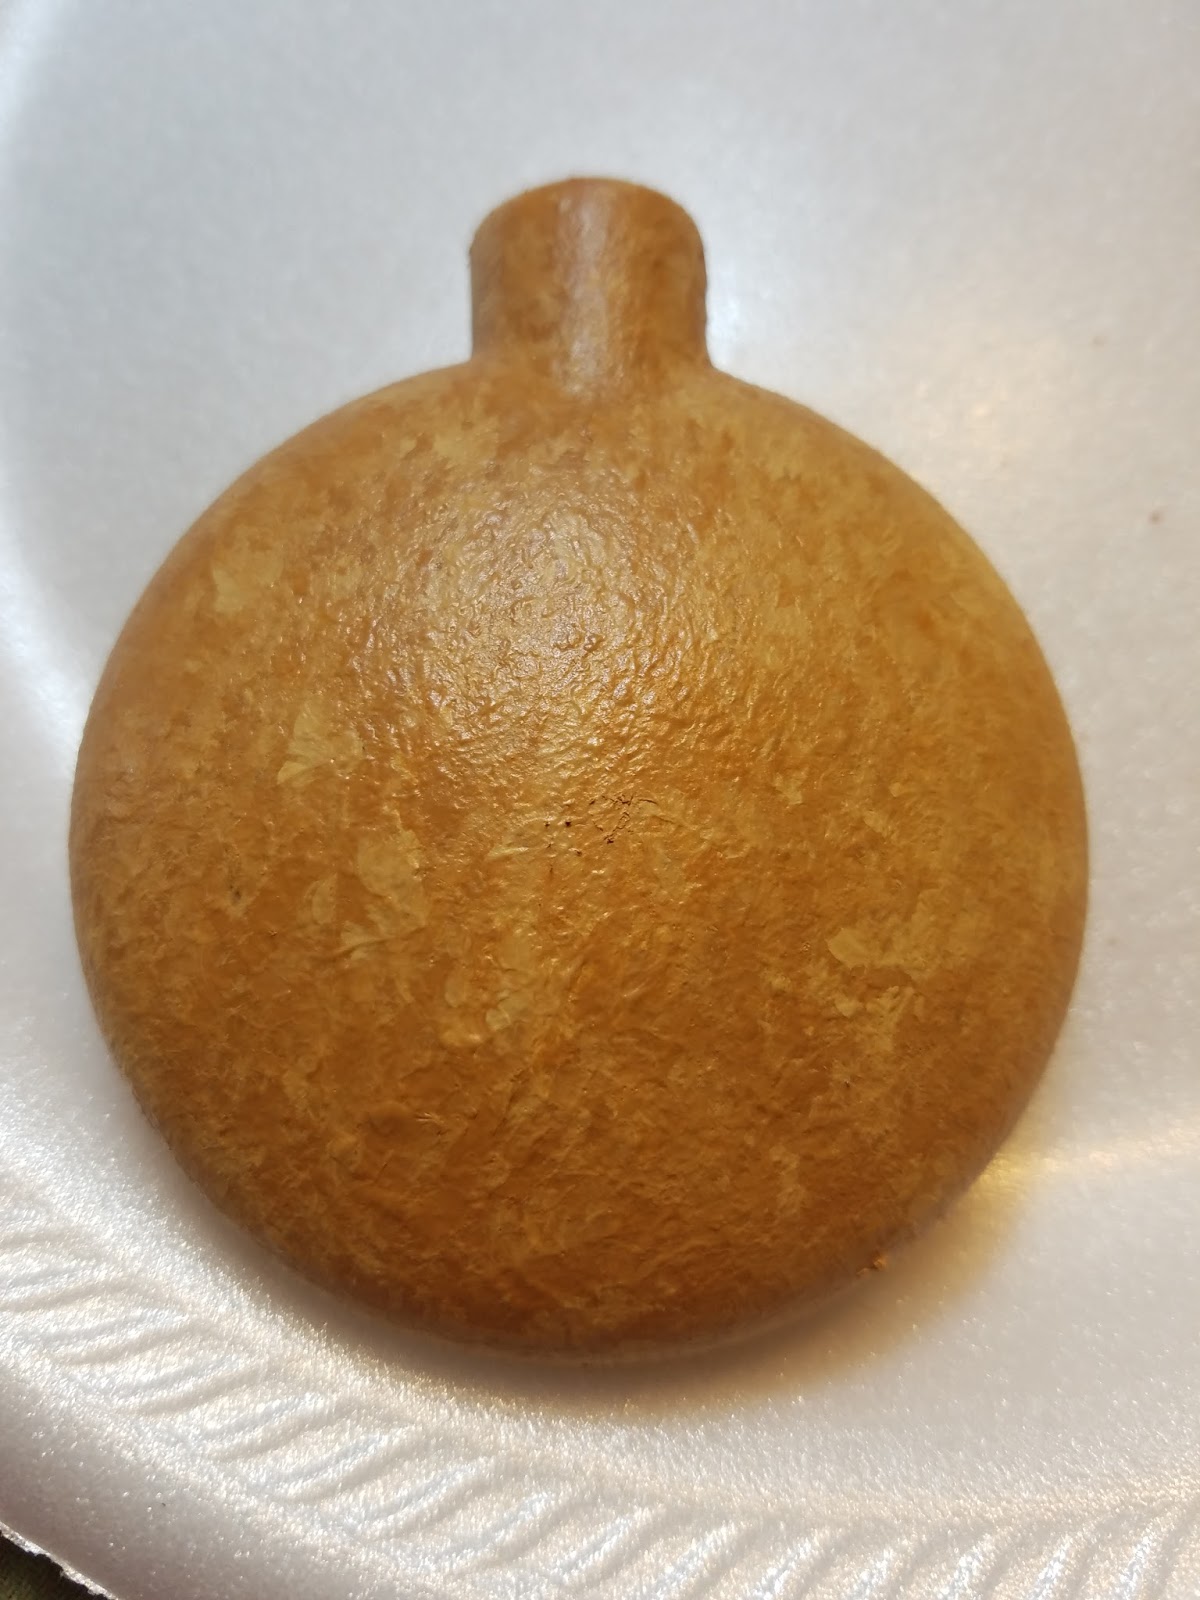
This sweet gingerbread is painted on a flat glass ornament that I bought at Hobby Lobby--half price, of course! 


I mixed a small puddle of Paint Adhesion with the same amount of my base coat, Honey Brown this time, and using an old scruffy brush, I stippled it on, because that is the look I wanted.

Note: the fact that I stippled on the paint, gave it some texture, or "tooth", to help more by giving the top layers something to hold onto! Lots of people will sponge on the basecoat for this reason.


Since I didn't get a complete coverage, I used the same mix to again stipple my ornament, but I picked up a lighter brown, Camel, to mix with it to give it the look of texture.


Be sure to allow both colors to show, because you don't want mud!

Some people forget that Fast, Fun and Fabulous painting does not have to be boring! 😉


I started adding the face.

PLEASE purchase a good liner, and learn to use it. It makes a world of difference in the quality of your work. 

I suggest an 18/0 liner. 


More details were added, and again, I strongly suggest learning how to float color.

Highlighting the eyes, top of the nose, and mouth add such quality! 

There are many videos on you-tube.

Any Mogish has an excellent video on her blog.  It isn't the method I use, but it is worth learning her way.


Adding the icing is always fun. Again, done with a 18/0 liner. And those eyelashes! 😲

The comma strokes were done with a #2 Round --another must have brush for me.

Again, floating shade around the eyes, icing, under the nose, under the mouth adds such dimension, and will set your work above! 

Learn to float--did I mention that? 😁😂


Have fun with eyes. 

Learn where to place highlights so that they look in different directions.

I can't tell you how much I can't stand to see Santa's with their eyes looking in their eyelids--heavy sigh...

Pinterest is filled with eye tutorials! I have a board on my pinterest account  (Charlotte Fletcher) that you can follow...


Now, aren't these adorable.

Look at the details on these cuties! 


But wait...the fur was a flying! 

Don't they look like Phyllis Diller?!

I LOVE THEM! 


Cuteness overload! 


Just because it is 
something easy, 
it can still be

FUN
FAST and
FABULOUS!

I am simply blessed to create~charlotte ♡


Saturday, November 25, 2017

How many of you get a text asking what kind of deodorant you use?

Well, today was my lucky day.
The reason isn't as funny if I explain it, so keep wondering! 
😁😂🤣😃

In the bag was a 
new tennis ball for Charcoal
A box of Little Debbie Oatmeal Pies
2 bottles of deodorant 
AND
This cute package of Napkins!


Yep, could NOT wait to 
create something 
with them...

Oh, wait...
people use them 
to wipe their 
hands and mouth??

What a waste!

I quickly separated the 3 layers
Cut out one section
Tore the edges
Yes, the tearing of the edges
 took longer 
than anything!🤤


 I grabbed my new bottle
 of Pewter Extreme Sheen
 because it matched 
that little line in the napkin.

When creating, 
you can get inspired
 by anything.
This time I tried to 
carry out the style of the napkin.

I based my
6 inch wooden canvas
with 2 coats.


I chose 3 colors of
Dazzling Metallics
that were similar
To colors used
 in the design.


I grabbed a piece 
of my favorite "stencil",
 punchinello


I randomly added dots 
with the 3 colors, 
one color at a time.
Yes, I carried the 
dots to the edges.


I attached the napkin 
with DecouPage.


To carry out the style,
 I decided to add the 
blanket stitch
like was around the tree,
 to the edges of the napkin
 and to the wooden canvas.


Cool, huh?!

I decided the lettering
 needed to show better, 
so I went over it 
with a Gelly Roll Pen.

The stitching could have been done 
with this, also.

Be sure to use a 
Spray Varnish when using a pen! 
It will smear, if you don't.


Another 
Fast, 
Fabulous 
and FUN  
project!


I  think the sentiment says it all!


Thank you, Miss Wanda...

I am Thankful for YOU!

I am simply blessed to create~charlotte♡


Sunday, November 19, 2017

Pecans and Pimento

If idle hands truly are the Devil's workshop, then my Daddy had nothing to worry about.

Working was his hobby.

Don't get me wrong, he loved to talk to people and to pick on them, but never did he tary long. He had things to do.

When fall arrived, and winter was near, Daddy loved to pick up nuts, and crack them in his rocking chair by the gas hearter, after supper.


Each night, as he came to the house from the shop, where he cut my wood for me to paint, he would wander toward the orchard to pick up a pocket full of pecans.


With two cooks in the house, we knew how blessed we were to have a never ending supply of pecans!

When our tobacco barn burned several years ago, Daddy was kindly trying to make sure the fireman kept the GOOD Pecan tree watered, because the barn could not be saved, but the tree could produce.

I laughed at him, but he was right!


Today, as I was trying to get Charcoal to come back to the house,  I stood 8 feet away, screaming at him, as he ignored me. It drives me crazy!!

When he finally decided to acknowledge my presence on the earth, we were walking back, when I stopped to get a stick to throw, and I saw a Pecan on the ground. I had no idea there was a Pecan Tree there!


We got back inside and enjoyed the roast/carrots/potatoes/onion/celery I had cooked on this chilly morning.

He took a nap and I putzed. As the day was drawing dark, I decided to go see if there were pecans at the GOOD tree.


There was one...then another. I decided to try to get 100! I got approximately 112, in case one or two were bad, and, well, there were one or two bad ones! 😁😂🤣😃

Yep, like momma, I count stuff! 🤤

I am so excited to have a quart bag of mostly, pecan halves.


It felt so good to feel like I spent the day with Momma and Daddy, doing something that was so special to them.

Making memories out of memories.♡


All of this kinda goes along with my Facebook post about what was in your refrigerator when you grew up?

I had a friend ask HOW to make pimento cheese.

Well, y'all know that I don't measure stuff, but maybe this can get you there.


Pimento Cheese was always made with American Cheese, at my house.

As I have gotten older, I have discovered that you can use your favorite cheese or cheeses mixed.

Last night, I made my "lazy" pimento cheese.  I even mixed it right into a ziplock bag,  so all that was dirty, was the fork I used to dig out the Miracle Whip! 😁😂🤣😃😄

Of course, if you want to mix it in a bowl, as most normal people do, go for it, but really--normal??!


I simply emptied a 2 cup bag of Sharp Cheddar Cheese into a quart ziplock bag. 

Added a 4 ounce jar of chopped pimento. 

A few shakes of black pepper (If you don't like pepper, don't add it, cause momma never did! 😁😂🤣😎)

Enough Salad Dressing (Miracle Whip) to bind it together--start with 1/2 cup, and remember, when it gets cold, it will get dry, or hard. I have no idea how much, really, because I just threw in 2 big blobs..😁😂🤣


I added about 2 Tablespoons of sugar to cut the tartness.

Close the ziplock, and gently combine the ingredients.

Throw it on a piece of celery, and you have Heaven on Earth!


This is the basic recipe, and there are tons of recipes on Pinterest. Many use Cream Cheese. Some add garlic...onion...Some use different cheeses...but I have shared what I grew up eating.  Mother made it in the blender, so it was smooth.  Not much is better than pimento cheese on white bread, cut on a wedge, served alongside homemade chilli! 

If you really want something fancy, add some crushed pineapple in there...

You can add jalapeno, too!

Today has been a good day.

I am, once again, reminded of how blessed I am! 

When you get sad, pull out a favorite recipe and make it with a merry heart.

I am simply blessed to create~charlotte ♡

Tuesday, November 14, 2017

Lisa's Blocks

It is the time of year where busy doesn't begin to explain how busy we are!

I thought I would share blocks that I did last year that were inspired by Lisa Wells.

I asked if I could share on my blog, and she said YES!
She was so excited, because, that is the girl that she is--happy!

I am sharing again, this year.

I created a pdf that you can download at the end of this post that has some pictures and line drawings.

Create until your heart is content.
I ask, only, that if you share them, PLEASE give Lisa Wells credit, because, it is the nice thing to do!

I bought my blocks at the Dollar General store in the toy department.


I used, of course, DecoArt Americana paints, and when finished, I put Ice Crystal DecoArt Glamour Dust on them to sparkle. You may add gems, also.

Last year, I gave away at least 30 to those who served me. I placed them in a bag with a fun sized candy bar and a note saying THANK YOU FOR THE JOB YOU DO. I tied the top of the bag with Bakers twine.

I was more blessed by the smiles and hugs that I got!

Sunday, I started giving away some more RAKs. It does my heart good.

 I can't change the world, but I can brighter my little corner of the world, one smile at a time.

People don't need a piece of my mind, but, instead, a piece of my heart.

Thank you, Lisa,  for making my world a better place!
I love you and admire you.

I am simply blessed to create AND to have creative friends~charlotte♡


These are the pictures of one's
 that Lisa painted.

Oh, my, goodness...
Aren't they adorable!!


Click here to download the pdf